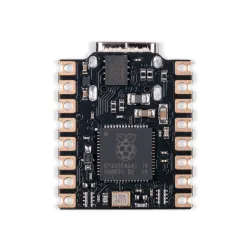
While we love the Raspberry Pi Pico we also wanted something smaller and with a bunch more flash on board. Introducing the Tiny 2350 - a teeny tiny powerhouse with the chops to realise truly ambitious projects.
Programmable via USB-C, Tiny 2350 comes with 4MB of flash storage on board. The board is designed with castellated pads to allow it to be directly soldered onto a PCB (or you can attach pin headers to hook it up on a breadboard or connect things to it directly with wires). We've also managed to fit in a programmable RGB LED, a reset button, a Qw/ST connector for connecting up I2C devices and some clever circuitry that lets you use the boot button as a user controllable switch.
It's compatible with firmware built for the Raspberry Pi Pico 2 but offers a reduced number of pins due to its size. You can even run MicroPython on it!
Features
- Powered by RP2350A (Dual Arm Cortex M33 running at up to 150MHz with 520KB of SRAM)
- 4MB of QSPI flash supporting XiP
- USB-C connector for power, programming, and data transfer
- User controllable RGB LED
- Qw/ST (Qwiic/STEMMA QT) connector for attaching breakouts
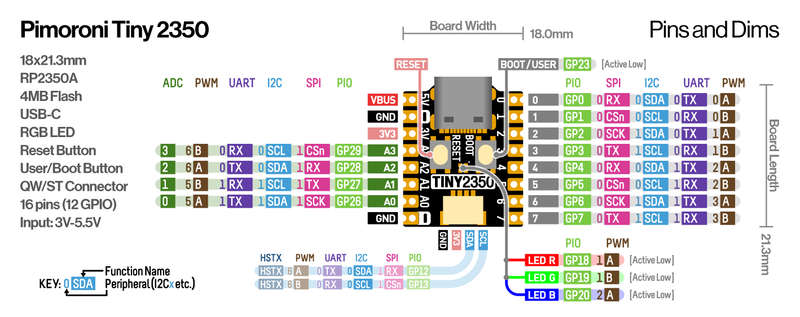
- Twelve IO pins (including four 12-bit ADC channels)
- Reset and BOOT buttons (the BOOT button can also be used as a user button)
- On-board 3V3 regulator (max regulator current output 300mA)
- Input voltage range 3V - 5.5V
- Programmable with C/C++ or MicroPython
- Dimensions: approx 22.9 x 18 x 5.8mm (L x W x H, including the USB-C port)
About RP2350
The RP2350 chip is the Double Quarter Pounder & Fries to the RP2040's Double Cheeseburger and can have one or more RISC-V burgers instead of either of the M33 ARMs, to stretch the metaphor.
In addition to the modern M33 ARM cores, there are sides of: more PIO capability, a variety of low power states for sipping electrons, a whole security system and some sprinklings of specialist digital video circuits to offload DVI/HDMI output.
You can expect a tasty boost in performance - our "real world" MicroPython tests are running up to 2x faster compared to RP2040, and floating point number crunching in C/C++ is up to 20x faster. The extra on-chip RAM will make a big difference when performing memory intensive operations (such as working with higher resolution displays) and even more can be added thanks to external PSRAM support.
RP2350 comes in two flavours - A (standard) and B (all the pins). The B chip has a stonking 48 usable GPIO pins, including 8 ADCs and 24 PWMs, and features on some of our new products.
What's in the box?
1 x Tiny 2350 board
Resources
Pinout and Schematic
- Download a printable PDF version
- Schematic (coming soon)
Getting Started
- RP2350 MicroPython builds and examples
Connecting Breakouts
If your breakout has a Qw/ST connector on board, you can plug it straight in with a JST-SH to JST-SH cable, or you can easily connect any of our I2C breakouts with a JST-SH to JST-SH cable coupled with a Qw/ST to Breakout Garden adaptor.
- Breakouts currently compatible with our C++/MicroPython build
Notes
- As well as being useful for putting your Tiny 2350 into bootloader mode, you can also use the BOOT button as a user switch. It's wired to GP23 and active low.
- The RGB LED is connected to GP18-GP20 and active low (so the on/off state will work in the opposite way to the LED on a Raspberry Pi Pico). You can PWM the pins to dim the LED - check out Tonygo2's MicroPython example.
Note: Stock is currently available in South Africa for national shipping!